A walkthrough of the organization schema for Wrapt projects
Deciding on a particular architecture to organize Wrapt projects was a big deal for me. Project architecture is a foundational aspect that drives a lot of different operations and sets up a projects for maintainable success or a total mess. While I don't think there is a single 'correct' architecture to chose, there are certainly patterns that are better than others.
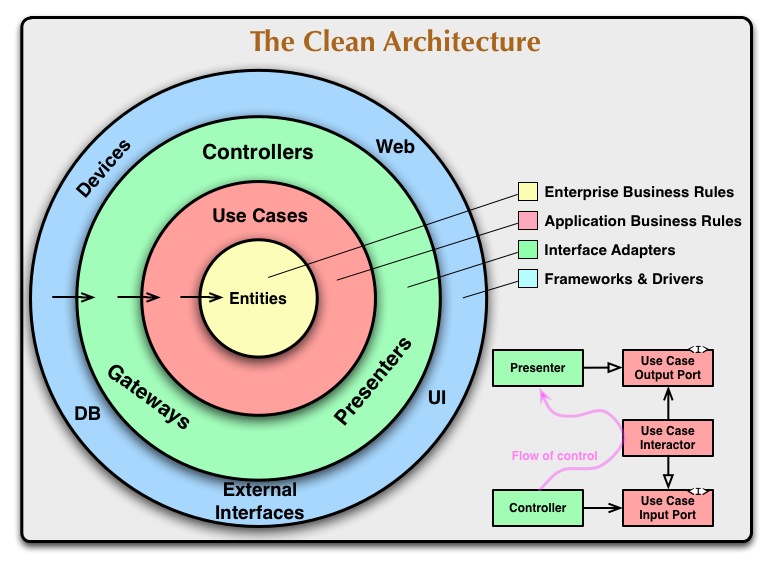
The first that came to mind was a Clean/Onion Architecture format. It is a well known pattern in the enterprise architecture world and there are some great resources on it by Steve Smith, Uncle Bob, and Jason Taylor.
After a lot of research and a couple of trial projects, I actually decided that this was the architecture I wanted to use for Wrapt and went forward with it through 0.8.2. And then I came across a different pattern...
Enter Vertical Slice Architecture (VSA). I came across one of Jimmy Bogard's talks on VSA and it really spoke to me. I also found out that it has worked really well for others as well, many of which who came from Clean projects.
For those not familiar, the short version is that Clean Architecture aims to separate the business rules from the I/O with designated layers while Vertical Slice Architecture aims to separate the code by features, aiming to minimize code sharing between features.
I'm planning on doing a detailed blog post on why I made this decision and how to work with VSA, but here are some of the benefits of VSA:
For those that want to read up more on VSA, here's some links.
Entities are set up by default to represent distinct tables in your database (though you can modify the scaffolding to change this when needed). These entities should not be exposed outside of the API and accordingly each have their own read, create,
and update data transfer objects (DTOs). There is also a common Manipulation DTO that the update and create DTOs inherit from to share common requirements.
Additionally, These entities will always inherit from a BaseEntity with a Guid Id property that will be set as the primary key as well as CreatedOn, CreatedBy, LastModifiedOn, and LastModifiedBy for auditing and consistency across your domain.
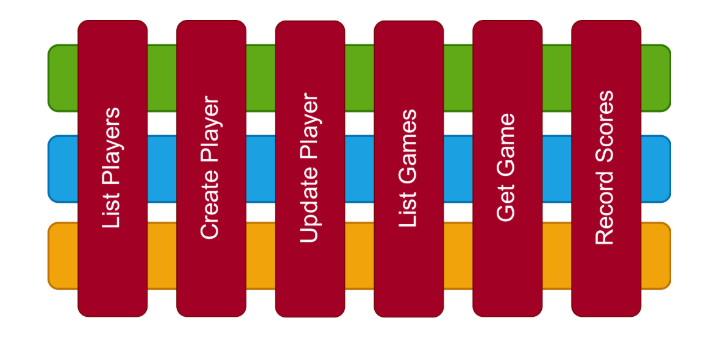
Features are one of the pivotal patterns of a Vertical Slice Architecture. Each feature lives in the Feature folder of the within the Domain directory and
will correspond to various actions that can be performed on each of your entities. Out of the box, Wrapt will give you basic CRUD features for each of your entities to
get a list, get a record, create a record, update a record, partially update a record, and delete a record.
As your project grows, you can continue to add more features (or update these existing ones) to meet your business needs.
In practice, each controller is essentially acting as a router to a feature and that's all. All the business logic behind the endpoint lives in the feature (or, even better, in the domain entity that is used by the feature). The features themselves are MediatR commands or queries that are fed into a handler that return a response.
It's worth noting that these features do NOT have repositories. In fact, there are no repositories in this architecture at all by design. This gives you the ability to control how each feature accesses the data however is appropriate for that particular feature. There are other benefits here as well that I'll detail in my blog and repositories do have their place, but they are not forced on you by default. With that said, you are more than welcome to use repositories in your projects, you'll just need to update the features manually.
Wrapt APIs use the magnificent Sieve library for filtering and sorting. All GET list features will have this capability enabled automatically and can be used for any attributes that you have this configured for like so:
[Sieve(CanFilter = true, CanSort = false)]
public string FirstName { get; set; }
These properties can be set when creating an entity or
adding a new property, otherwise you'll need to manage filtering and sorting on existing entity properties manually. There are details in the docs, but all you
need to to is manage the Sieve attribute on any entity properties.
Note that Wrapt APIs do not use Sieve's pagination capabilities. For more information on how Wrapt handles pagination, see the pagination section.
To add a filter to your API calls, just add a Filters query string and the designated filter values you'd like to use. Below is a few examples, but you can find a full list of
operators on the Sieve github page.
http://localhost:5000/api/staff?Filters=firstname@=*al
http://localhost:5000/api/cities?Filters=name==Atlanta
Sorting can also be added using the SortOrder query string and passing a comma separated list in the order you'd like to sort by. You can use a preceding - to sort as descending.
http://localhost:5000/api/cities?SortOrder=name
http://localhost:5000/api/cities?Filters=name==Atlanta&SortOrder=name
http://localhost:5000/api/cities?Filters=name==Atlanta&SortOrder=name,-popularityscoreIf you'd like to change the pagination and/or sorting, you can update the ENTITYParametersDto.
Wrapt APIs use a custom pagination capability to make working with large dataset as easy as possible out of the box.
When making a request to your GET list endpoint, you can pass a PageNumber and PageSize query string, or exclude them to use the default values.
To change the default pagination values, go to the ENTITYParametersDto class that you'd like to modify and create an override parameter for the property you'd like to change. Be sure to set the permission level to internal to match the inherited permissions.
public class CityParametersDto : BasePaginationParameters
{
    internal override int DefaultPageSize { get; set; } = 50;
    public string Filters { get; set; }
    public string SortOrder { get; set; }
}
Please note that if you make change to the BasePaginationParameters class, it will affect all classes that inherit from it (which is every one by default). This is one of the few classes in Wrapt projects
that is shared between multiple features as it is a common base to work from that is easily overridden.
Getting paginated results is nice, but you'll very likely want to know information about the collection's pagination info as well, especially when you're programming a UI. Wrapt APIs
will automatically return a complete list of pagination metadata in the response header as X-Pagination. The following fields will be returned:
| Metadata | Description |
|---|---|
| TotalCount | The total record count for the entire collection. |
| PageSize | The page size that was requested. |
| CurrentPageSize | The current page size. |
| CurrentStartIndex | The index of the first record on this page. |
| CurrentEndIndex | The index of the last record on this page. |
| PageNumber | The current page number in the collection. |
| TotalPages | The total page count for the entire collection. |
| HasPrevious | A boolean that denotes whether or not there is a previous page. |
| HasNext | A boolean that denotes whether or not there is a next page. |
Generally, we want to push our behaviors down into our domain entity. This means that our CQRS handlers get thinner and thinner and is really just performing data access logic (no need for an extra repository layer) so we can get delegate all the meat of the work in the domain logic. This means we have a fully encapsulated, 'always valid' domain.
Now, before we do all that work in the handler/domain logic, we need to check if we actually can do that thing that we want to do. Enter validation. So we want to center our validation around our requests and our handlers.
Validation can generally be broken up into two main categories 1) request validation and 2) command validation.
Request validation is just us making sure that the data in the request itself is valid to be submitted. Do we have all of the required fields, is a particular field a certain minimum length, etc.
Wrapt projects bring in Fluent Validation for you to use if you would like. Data annotations or built in domain validation are two other options as well. Feel free to use whatever works best for you! The main goal here is that you are able to validate the data that is coming in to your API.
If you're using fluent validation, validation rules can be assigned to the ENTITYForManipulationDtoValidator class if you'd like the rule to be run on both creation (POST calls) and update (PUT, PATCH). If you'd like a rule to just be ran on one or the other, you can add the rule to
the respective validator class. You might also consider a validator for your domain entity directly.
The OOTB rules for Fluent Validation are pretty robust, but if you need to make a custom validation rule, something like the below from this blog is a good example.
public static class CustomValidators
{
    public static IRuleBuilderOptions<T, string> NotStartWithWhiteSpace<T>(this IRuleBuilder<T, string> ruleBuilder)
    {
        return ruleBuilder
          .Must(m => m != null && !m.StartsWith(" "))
          .WithMessage("'{PropertyName}' should not start with whitespace");
    }
}
public class PersonValidator : AbstractValidator<Person>
{
public PersonValidator()
{
RuleFor(e => e.FirstName)
.NotEmpty()
.MaximumLength(30)
.NotStartWithWhiteSpace();
RuleFor(e => e.LastName)
.NotEmpty()
.MaximumLength(30)
.NotStartWithWhiteSpace();
}
}Note that these rules are only looking at the request object itself. They can't go out to something external and check for some validation there.
Command validation is where we have more complex business validations come into play that can work with the database or other external systems. These domain level validations make sure that:
This validation can be added in your command handler or, even better, encapsulated in your domain entity. This could go so far as needing to be a service that is passed in to a creation factory as an interface with the capability to perform whatever validation needs to happen.
Wrapt projects support scaffolding for event driven features like producers and consumers in an event bus, messages, and more.
Messages are stored in a distinct project at the solution root as they are generally used to communicate across bounded contexts and shouldn't belong to any particular bounded context.
Producers and consumers can both be added as distinct features using the add:producer and add:consumer commands.
A common requirement is to add a producer to an existing feature. If that's the case, you can add an IPublishEndpoint to your command and publish your message like you usually would. For instance:
public class Handler : IRequestHandler<SubmitReportRequestCommand, ReportRequestDto>
{
    private readonly ReportingDbContext _db;
    private readonly IMapper _mapper;
    private readonly IPublishEndpoint _publishEndpoint;

    public Handler(ReportingDbContext db, IMapper mapper, IPublishEndpoint publishEndpoint)
    {
        _mapper = mapper;
        _db = db;
        _publishEndpoint = publishEndpoint;
    }

    public async Task<ReportRequestDto> Handle(SubmitReportRequestCommand request, CancellationToken cancellationToken)
    {
        if (await _db.ReportRequests.AnyAsync(r => r.ReportId == request.RequestToAdd.ReportId))
        {
            throw new ConflictException("Reporting Request already exists with this primary key.");
        }

        var reportRequest = _mapper.Map<ReportRequest>(request.ReportRequestToAdd);
        _db.ReportRequests.Add(reportRequest);
        var saveSuccessful = await _db.SaveChangesAsync() > 0;

        if (saveSuccessful)
        {
            var message = new
            {
              ReportId = reportRequest.ReportRequestId,
              Provider = reportRequest.Provider.ToString(),
              Target = reportRequest.Target.ToString()
            };
            await _publishEndpoint.Publish<ISendReportRequest>(message);

            return await _db.ReportRequests
                .ProjectTo<ReportRequestDto>(_mapper.ConfigurationProvider)
                .FirstOrDefaultAsync(r => r.ReportId == reportRequest.ReportId);
        }
        else
        {
            throw new Exception("Unable to save the new record. Please check the logs for more information.");
        }
    }
}
Note that adding a producer to a MediatR command like this will currently break the tests associated to it.
Wrapt will automatically scaffold out unit, integration and functional tests for each of your bounded contexts using NUnit.
Unit tests are meant to confirm that individual operations are working as expected (e.g. PagedList calculations).
Integration tests are meant to check that different areas are working together as expected (e.g. our features folder). These tests will spin up a real database in docker and run each of your feature tests in an actual representation of your database. If you're using eventing, an in-memory test harness for MassTransit will be set up for you to run eventing tests as well.
Functional tests are meant to check an entire slice of functionality with all the code running together. These are generally more involved to write and maintain, but with this project setup, our controllers are essentially just routers to our feature queries and commands, so we have already done the meat of our testing in our integration tests. This means that our functional tests can generally just confirm that we are getting the expected responses from our routes and we can call it a day.